Quick start
You need a running OpenCTI 7.261008.0 with Docker Compose, and a ChainPatrol API key. To install OpenCTI first, follow Filigran’s deployment guide.1
Create a ChainPatrol API key
In the ChainPatrol dashboard, go to Settings → API Keys and create a key.
2
Add the connector to your OpenCTI docker-compose.yml
Add this service next to your existing OpenCTI services:Then add
CONNECTOR_CHAINPATROL_ID and CHAINPATROL_API_KEY to the .env file next to it.3
Start it
Polling the organization threat feed, then a summary such as Organization threats: 120 fetched, 118 converted. If a setting is wrong, the connector exits with a one-line message naming it, for example ChainPatrol rejected CHAINPATROL_API_KEY (401).4
See your threats in OpenCTI
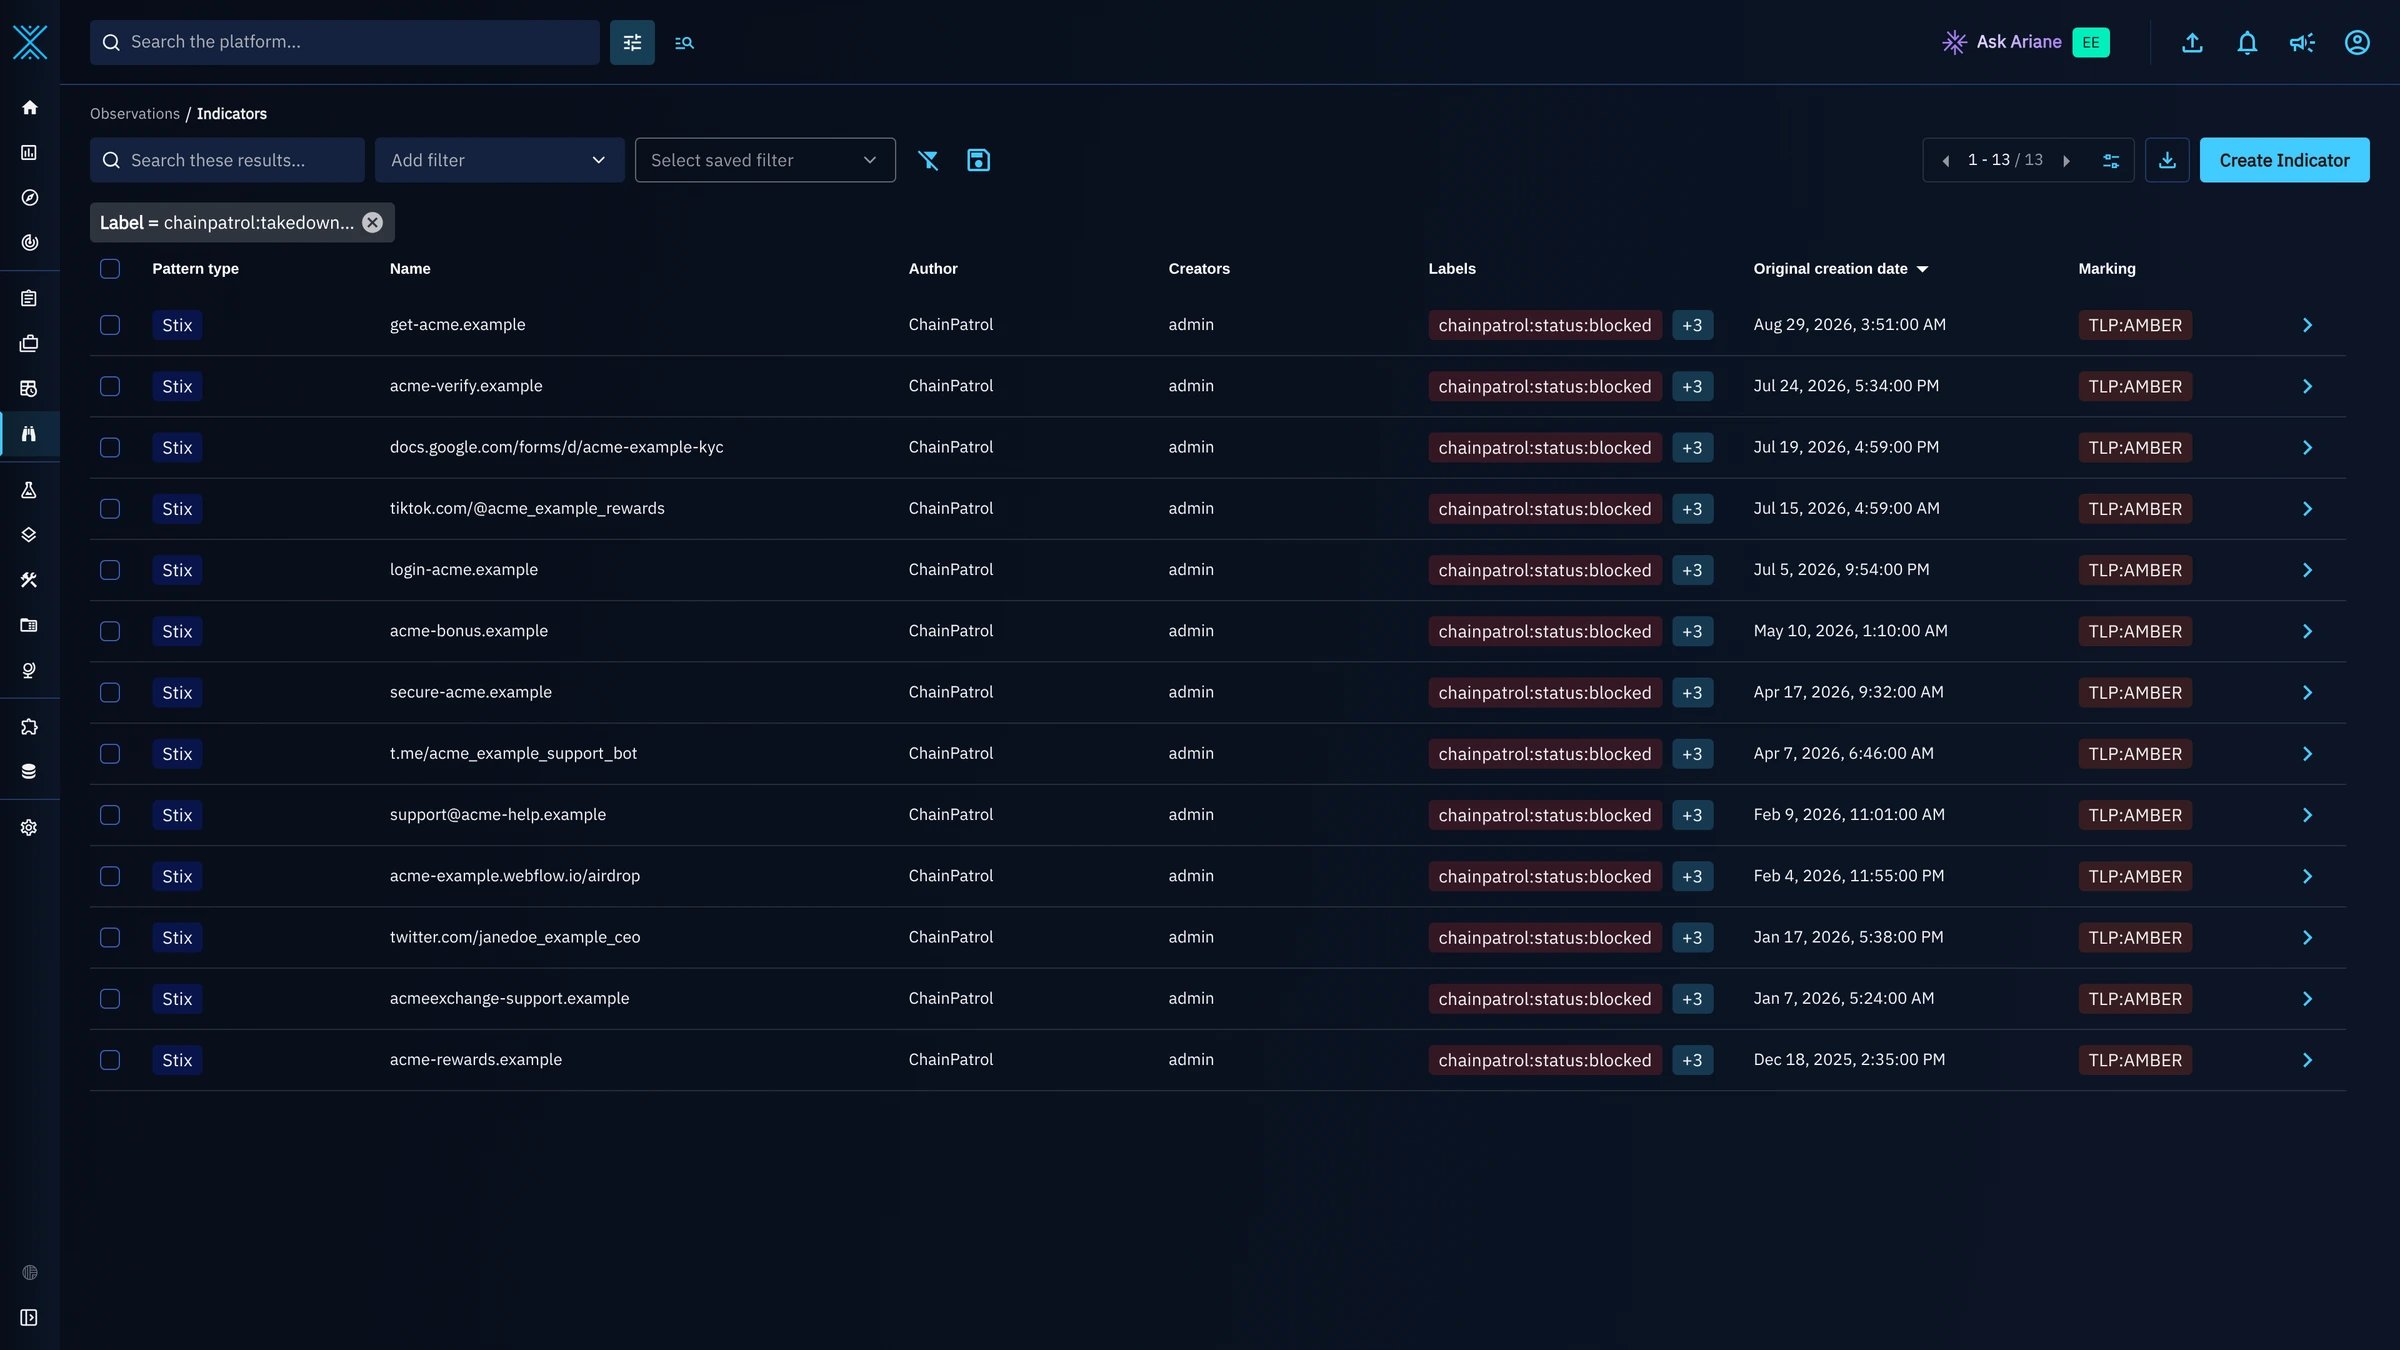
The connector appears under Integrations → Deployed. Your threats appear under Observations → Indicators, each labelled with its ChainPatrol status. The first sync imports your full history; OpenCTI’s workers can take several minutes to write it all, so scale them up for a large organization. After that the connector checks for changes every hour.
What it imports
The connector has two feeds, configured independently. Most deployments only want the first.Your organization’s threats (on by default)
Everything ChainPatrol has investigated on your behalf, from the moment a report is filed, not just once it is confirmed. Each asset carries labels describing where it is in its lifecycle:
The labels are on both the indicator and the observable. The label names are chosen so the status sorts first. OpenCTI orders an entity’s labels alphabetically and its list views show only the first one, so the status is the label you see in every list.
Connector versions before October 2026 used
chainpatrol:brand:* and chainpatrol:liveness:*. The first run after upgrading re-sends your organization’s threats once and replaces the old labels as it goes.The global blocklist (off by default)
Every asset on the ChainPatrol blocklist, roughly 500,000 entities, with no organization context: no brands, no reporting history, no takedown progress. Every asset is labelledchainpatrol:status:blocked.
This feed is marked TLP:CLEAR by default. It is off by default because the first run imports the whole blocklist.
If you enable both feeds, an asset that is on the global blocklist and was reported for your organization carries both TLP:CLEAR and TLP:AMBER. That is deliberate: the fact that it is blocked is public, but the investigation context around it is not.
How each asset is modelled
Each asset becomes up to four kinds of OpenCTI object:- Indicator: a STIX pattern such as
[url:value = 'https://…'], carrying the labels, the score and, for cleared assets,revoked: true. - Observable: the asset itself, carrying the same labels, score and summary as the indicator. The indicator is linked to it with a
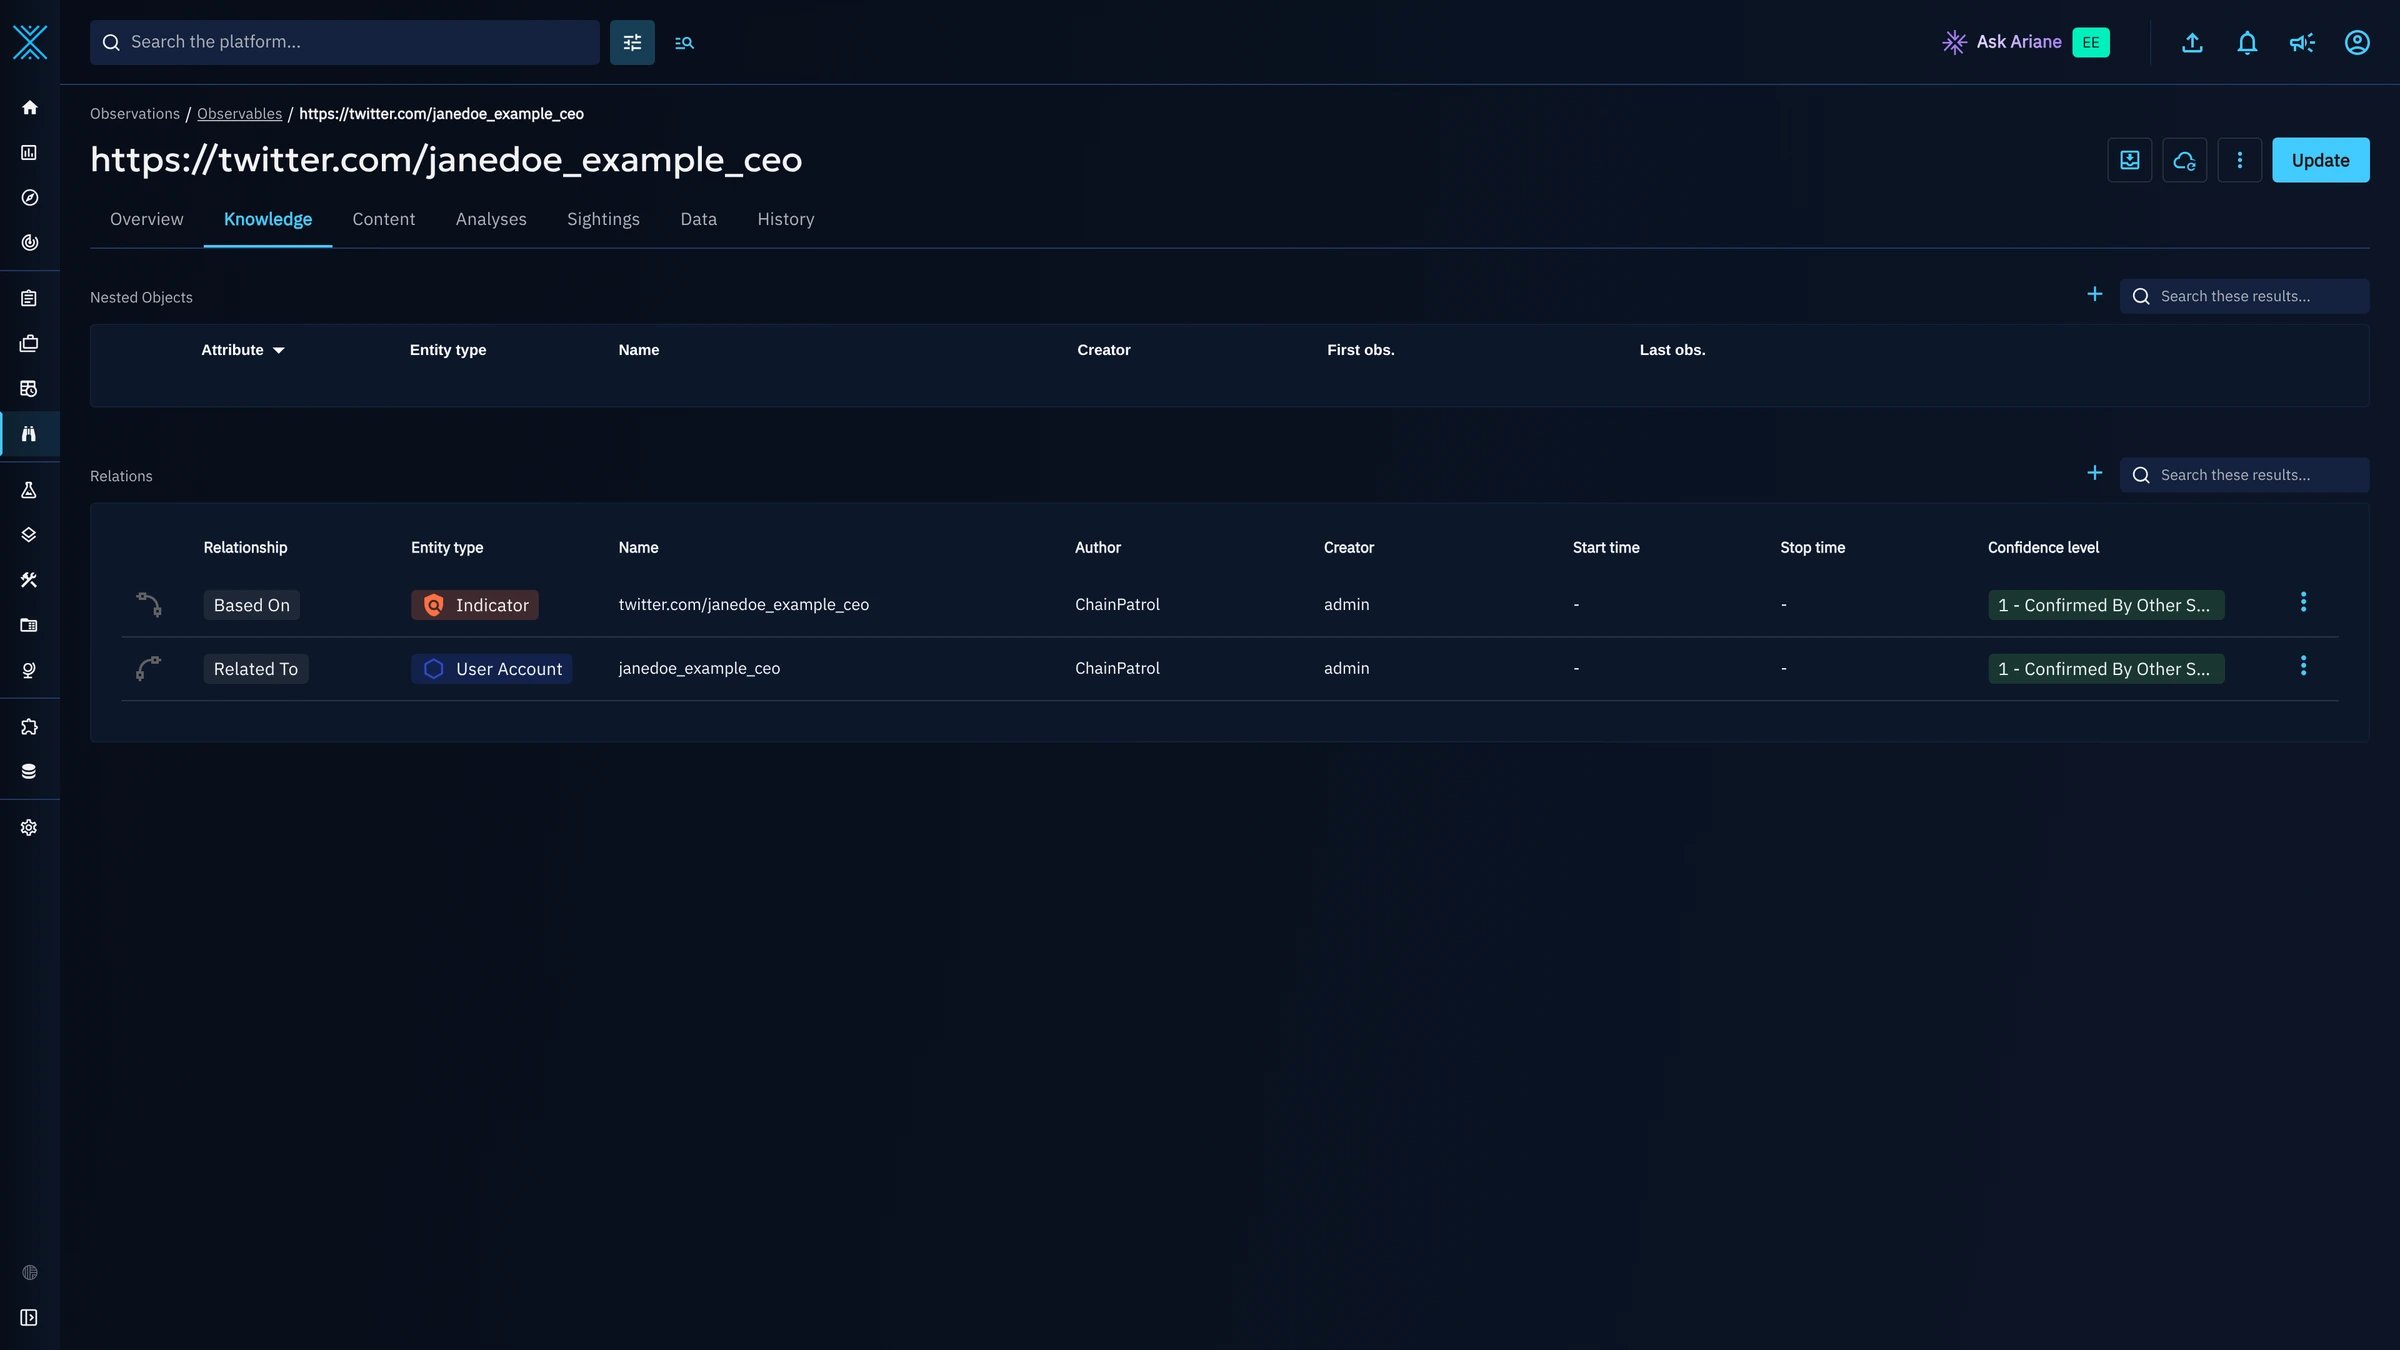
based-onrelationship. - User-Account: for social media profiles, the handle, linked to the observable with
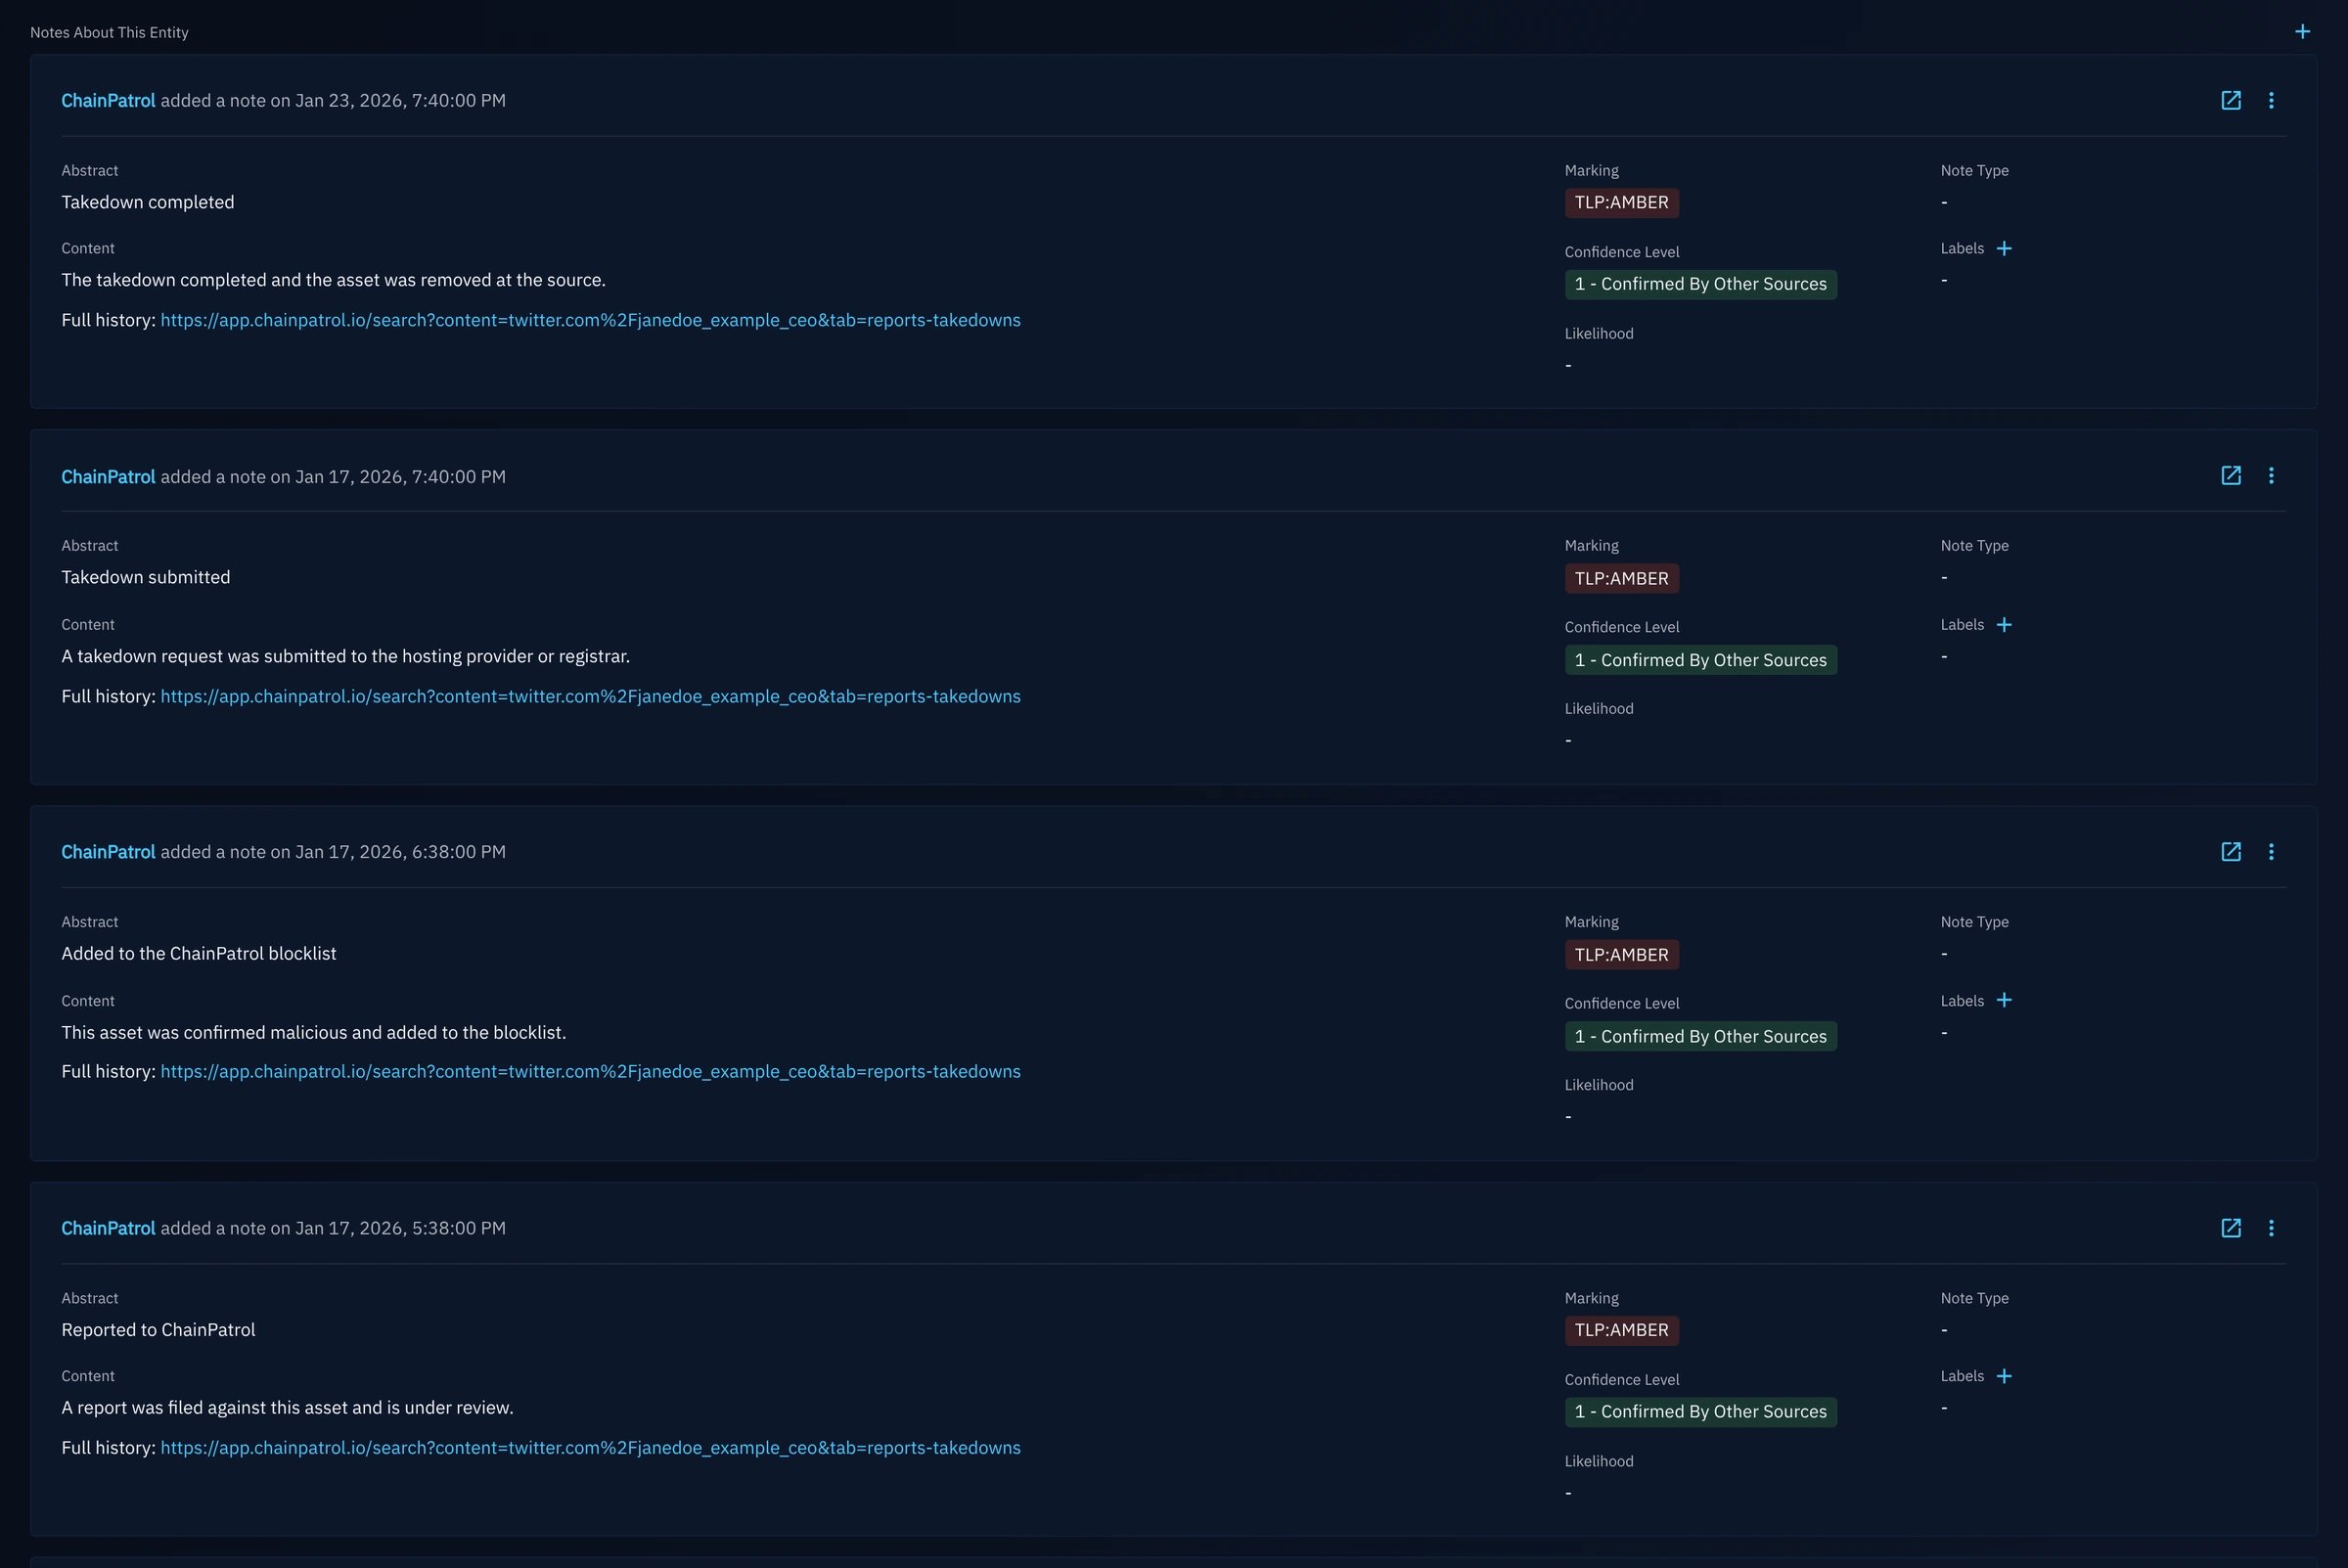
related-to. - Notes: one per lifecycle transition (reported, escalated, blocked, takedown submitted…), each with a link to the asset’s page in ChainPatrol.
Crypto addresses (
ADDRESS) and IP addresses are not imported yet.
The indicator and the observable both carry a one-line summary of the asset, for example “Confirmed malicious and blocked by ChainPatrol on 2026-01-17. First reported 2026-01-17. Impersonates Jane Doe. Takedown completed. It was unreachable at the last check.”, and a link to the asset’s page in ChainPatrol. Whichever one an analyst lands on first, they have the story.
Validity and decay
An indicator’s valid from date is the time of the sync that sent it, not the date the asset was reported or blocked. OpenCTI starts its decay clock at that date, so a historical one would make most of your history arrive already expired: OpenCTI would revoke a phishing site blocked a year ago that ChainPatrol still blocks. The real dates are kept as the indicator’s original creation date and in its notes. The connector only re-sends assets that changed, so it also re-sends every blocked asset every 7 days (CHAINPATROL_REFRESH_INTERVAL_DAYS). That restarts their decay before OpenCTI’s shortest built-in lifetime runs out, so a blocked asset stays active for as long as ChainPatrol blocks it. Assets in any other state are left to decay normally.
The global blocklist is too large to refresh this way. Its entries decay unless ChainPatrol updates them. If that matters to you, add a decay exclusion rule for them in OpenCTI.
Scores
Every indicator carries anx_opencti_score reflecting how sure ChainPatrol is, so you can build detection rules on a threshold. Only blocked assets are marked for detection (x_opencti_detection: true). An open report is a claim, not a finding.
You can change any of these scores. See Configuration.
Configuration
Every setting is an environment variable. When running from source, the same settings can go inconfig.yml under chainpatrol:, using the lower-case name without the prefix (for example CHAINPATROL_ORG_FEED_TLP becomes org_feed_tlp). Environment variables win over the file.
The connector checks its setup before it registers with OpenCTI. If something is wrong it exits with a one-line message naming the setting at fault, for example
ChainPatrol rejected CHAINPATROL_API_KEY (401) or OpenCTI rejected OPENCTI_TOKEN. It checks that:
OPENCTI_URL,OPENCTI_TOKENandCONNECTOR_IDare set, andCONNECTOR_IDis a UUID;- OpenCTI accepts
OPENCTI_TOKENand ChainPatrol acceptsCHAINPATROL_API_KEY; - at least one feed is enabled, every TLP, page size and score is in range, and no state scores higher than
blocked.
docker compose logs connector-chainpatrol if it does not appear in OpenCTI after a minute.
Polling
The first run is a full backfill: every threat in your history is imported. Later runs only fetch what changed since the previous run. Each run rewinds its starting point byCHAINPATROL_POLL_OVERLAP_MINUTES so that a change landing mid-run is never missed. Re-reading a few minutes is harmless, because every update is an upsert. If a run fails, the next one retries the same window instead of skipping it.
Labels you add are safe
OpenCTI adds labels without removing old ones, so an asset that moved frominvestigating to blocked would otherwise carry both. Before each update the connector removes the outdated chainpatrol:status:*, chainpatrol:takedown:* and chainpatrol:uptime:* label. It never removes chainpatrol:target:* labels, since several brands can apply, and it never touches labels outside the chainpatrol: prefix, so your analysts’ labels and other connectors’ labels are left alone.
Investigating in OpenCTI
Once the first sync has run, the examples below work on any OpenCTI instance with the connector attached. The screenshots use made-up example data for a fictional brand, Acme Exchange.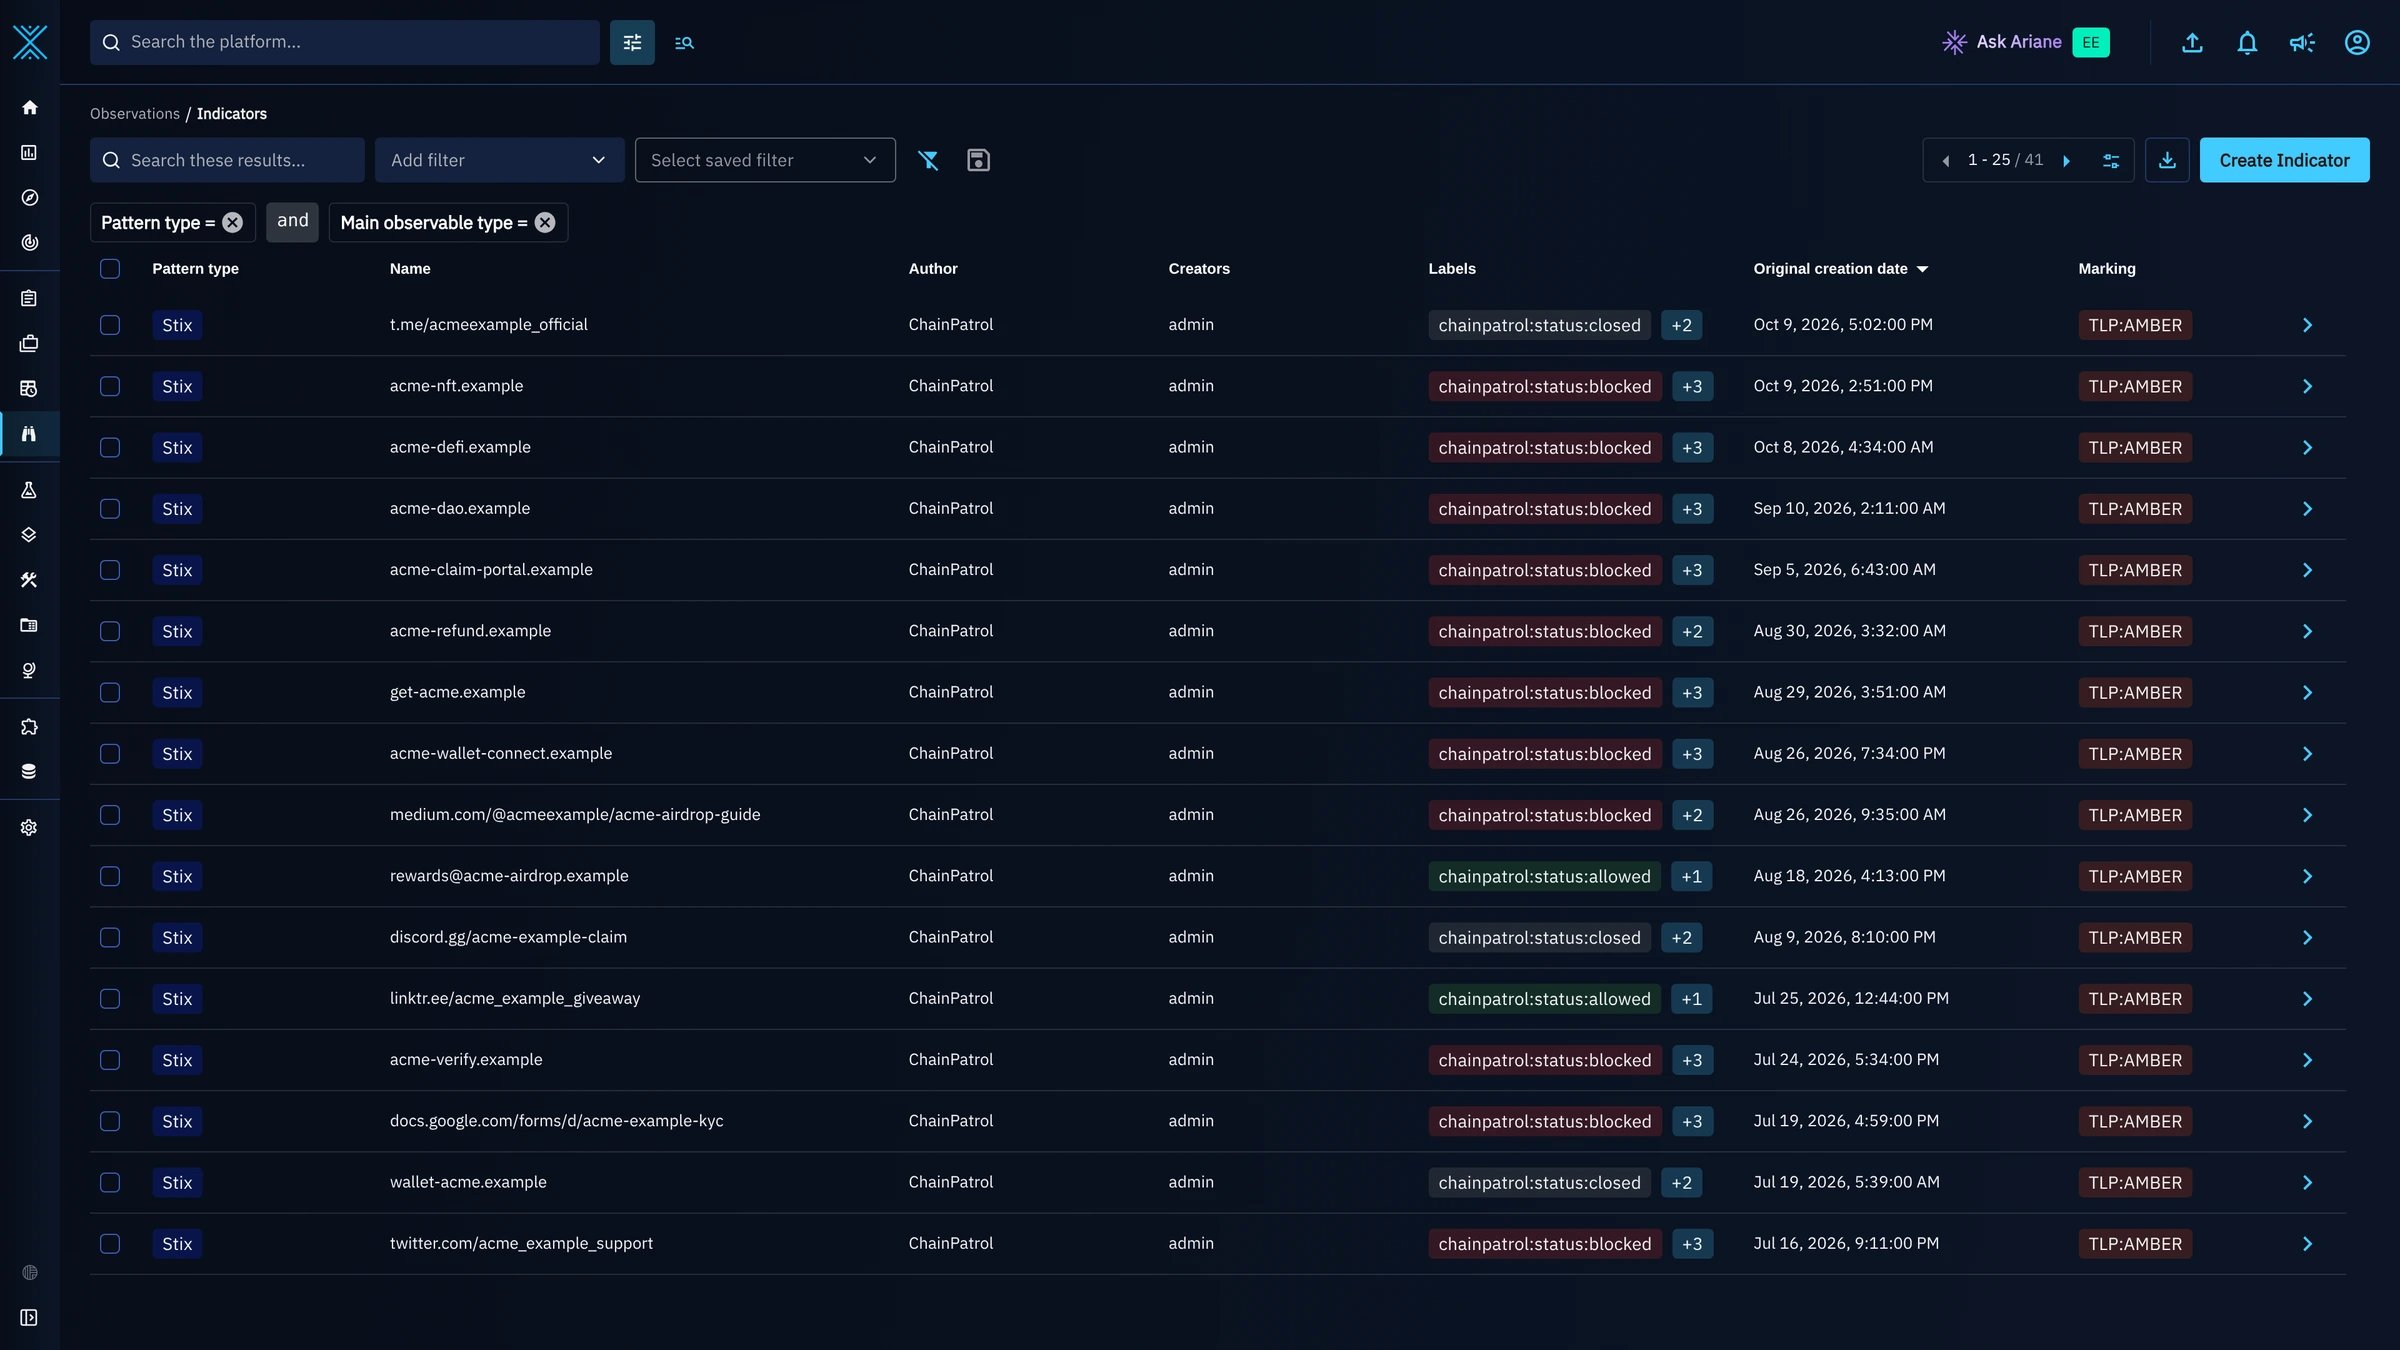
Find what is still live
Open Observations → Indicators, add a Label filter forchainpatrol:status:blocked, and a second one for chainpatrol:uptime:alive. What is left is every confirmed phishing site, fake profile or scam page that was still reachable at ChainPatrol’s last check. Those are the ones to block first or escalate. Save the filter to keep it as a standing work queue.
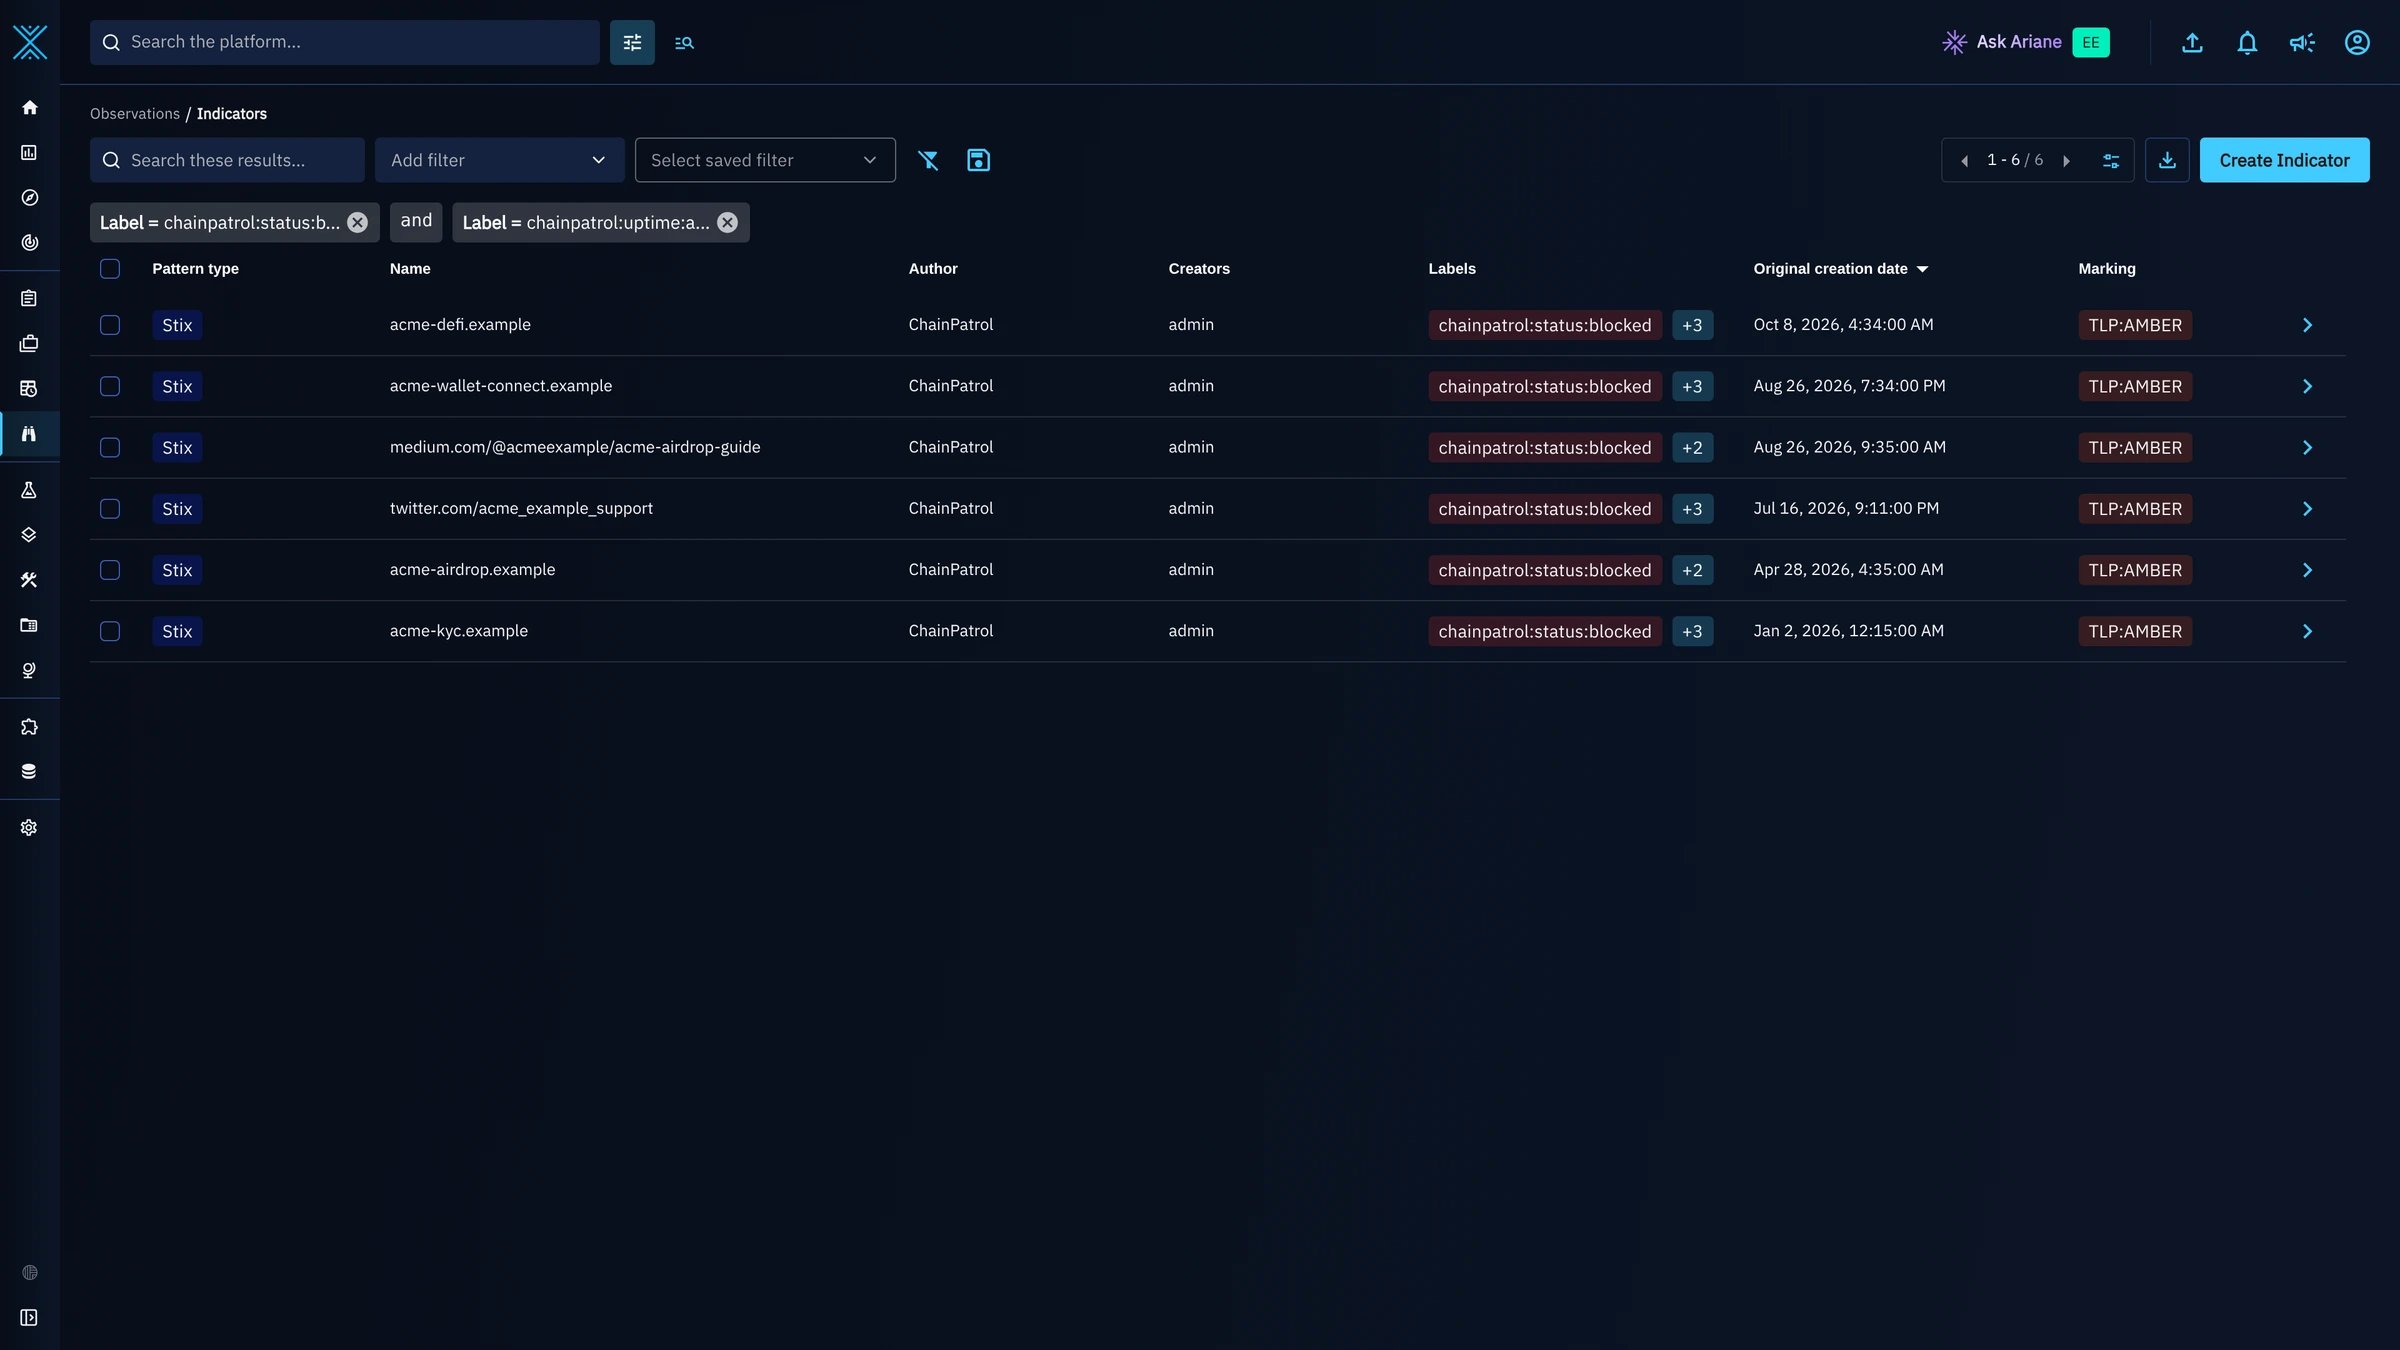
Check a domain, URL or handle from an alert
Paste the value from a SIEM alert, a reported email or a support ticket into OpenCTI’s global search. Every match shows its ChainPatrol status, and the Analyses column counts its lifecycle notes.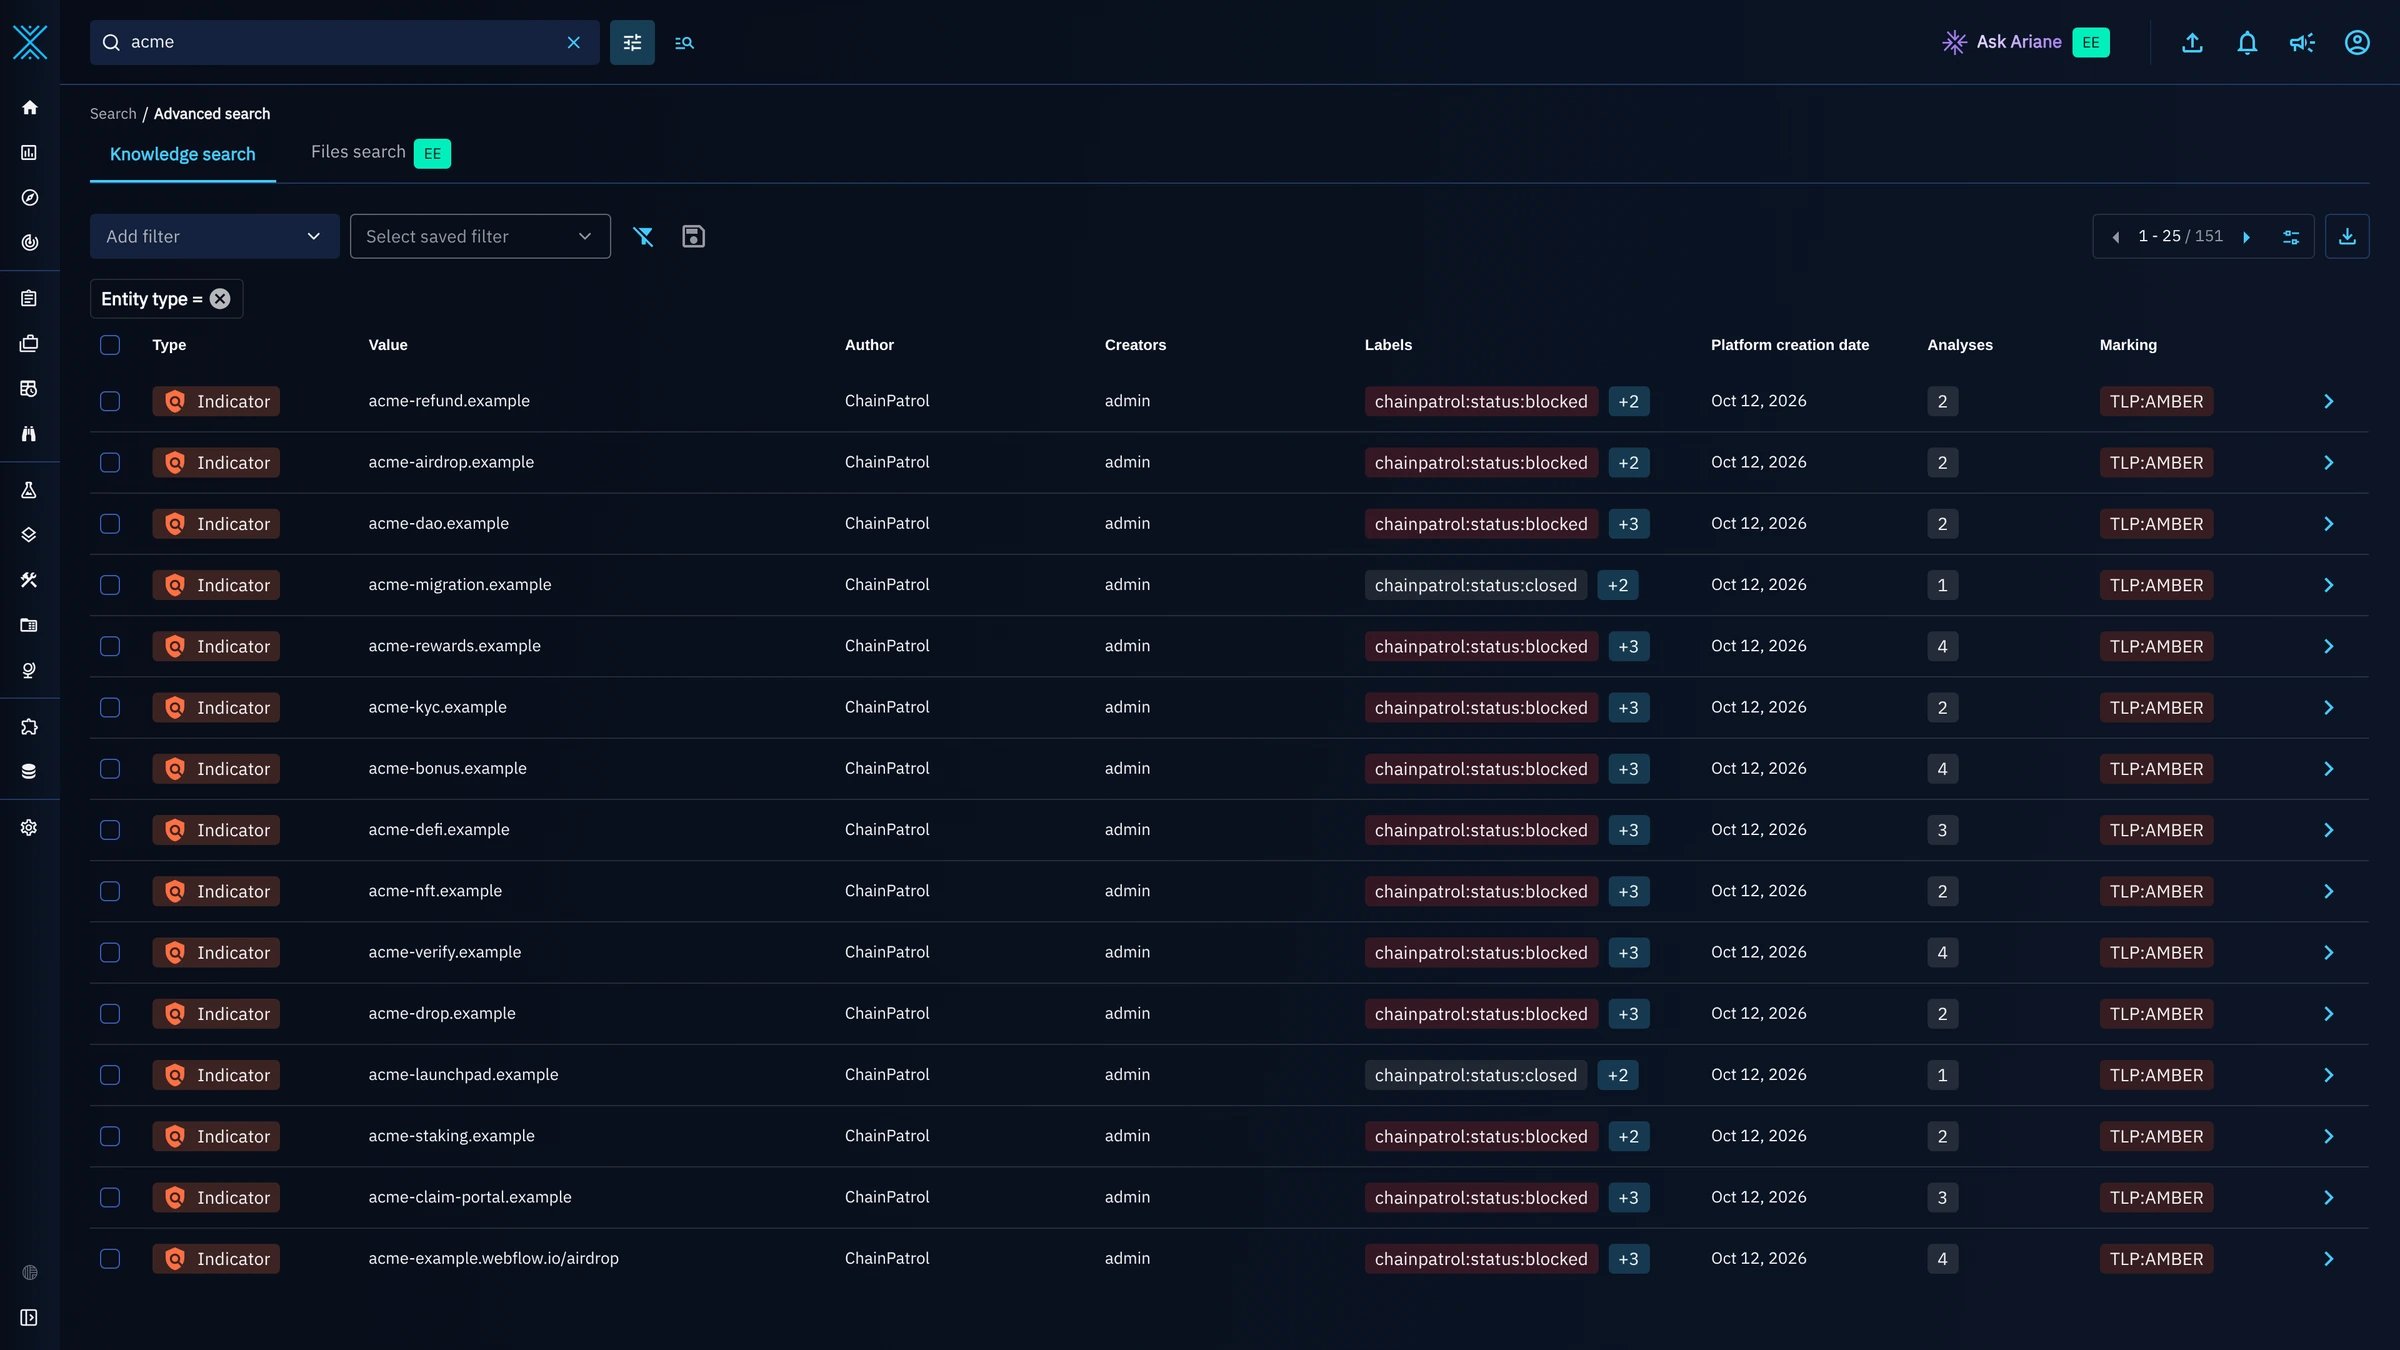
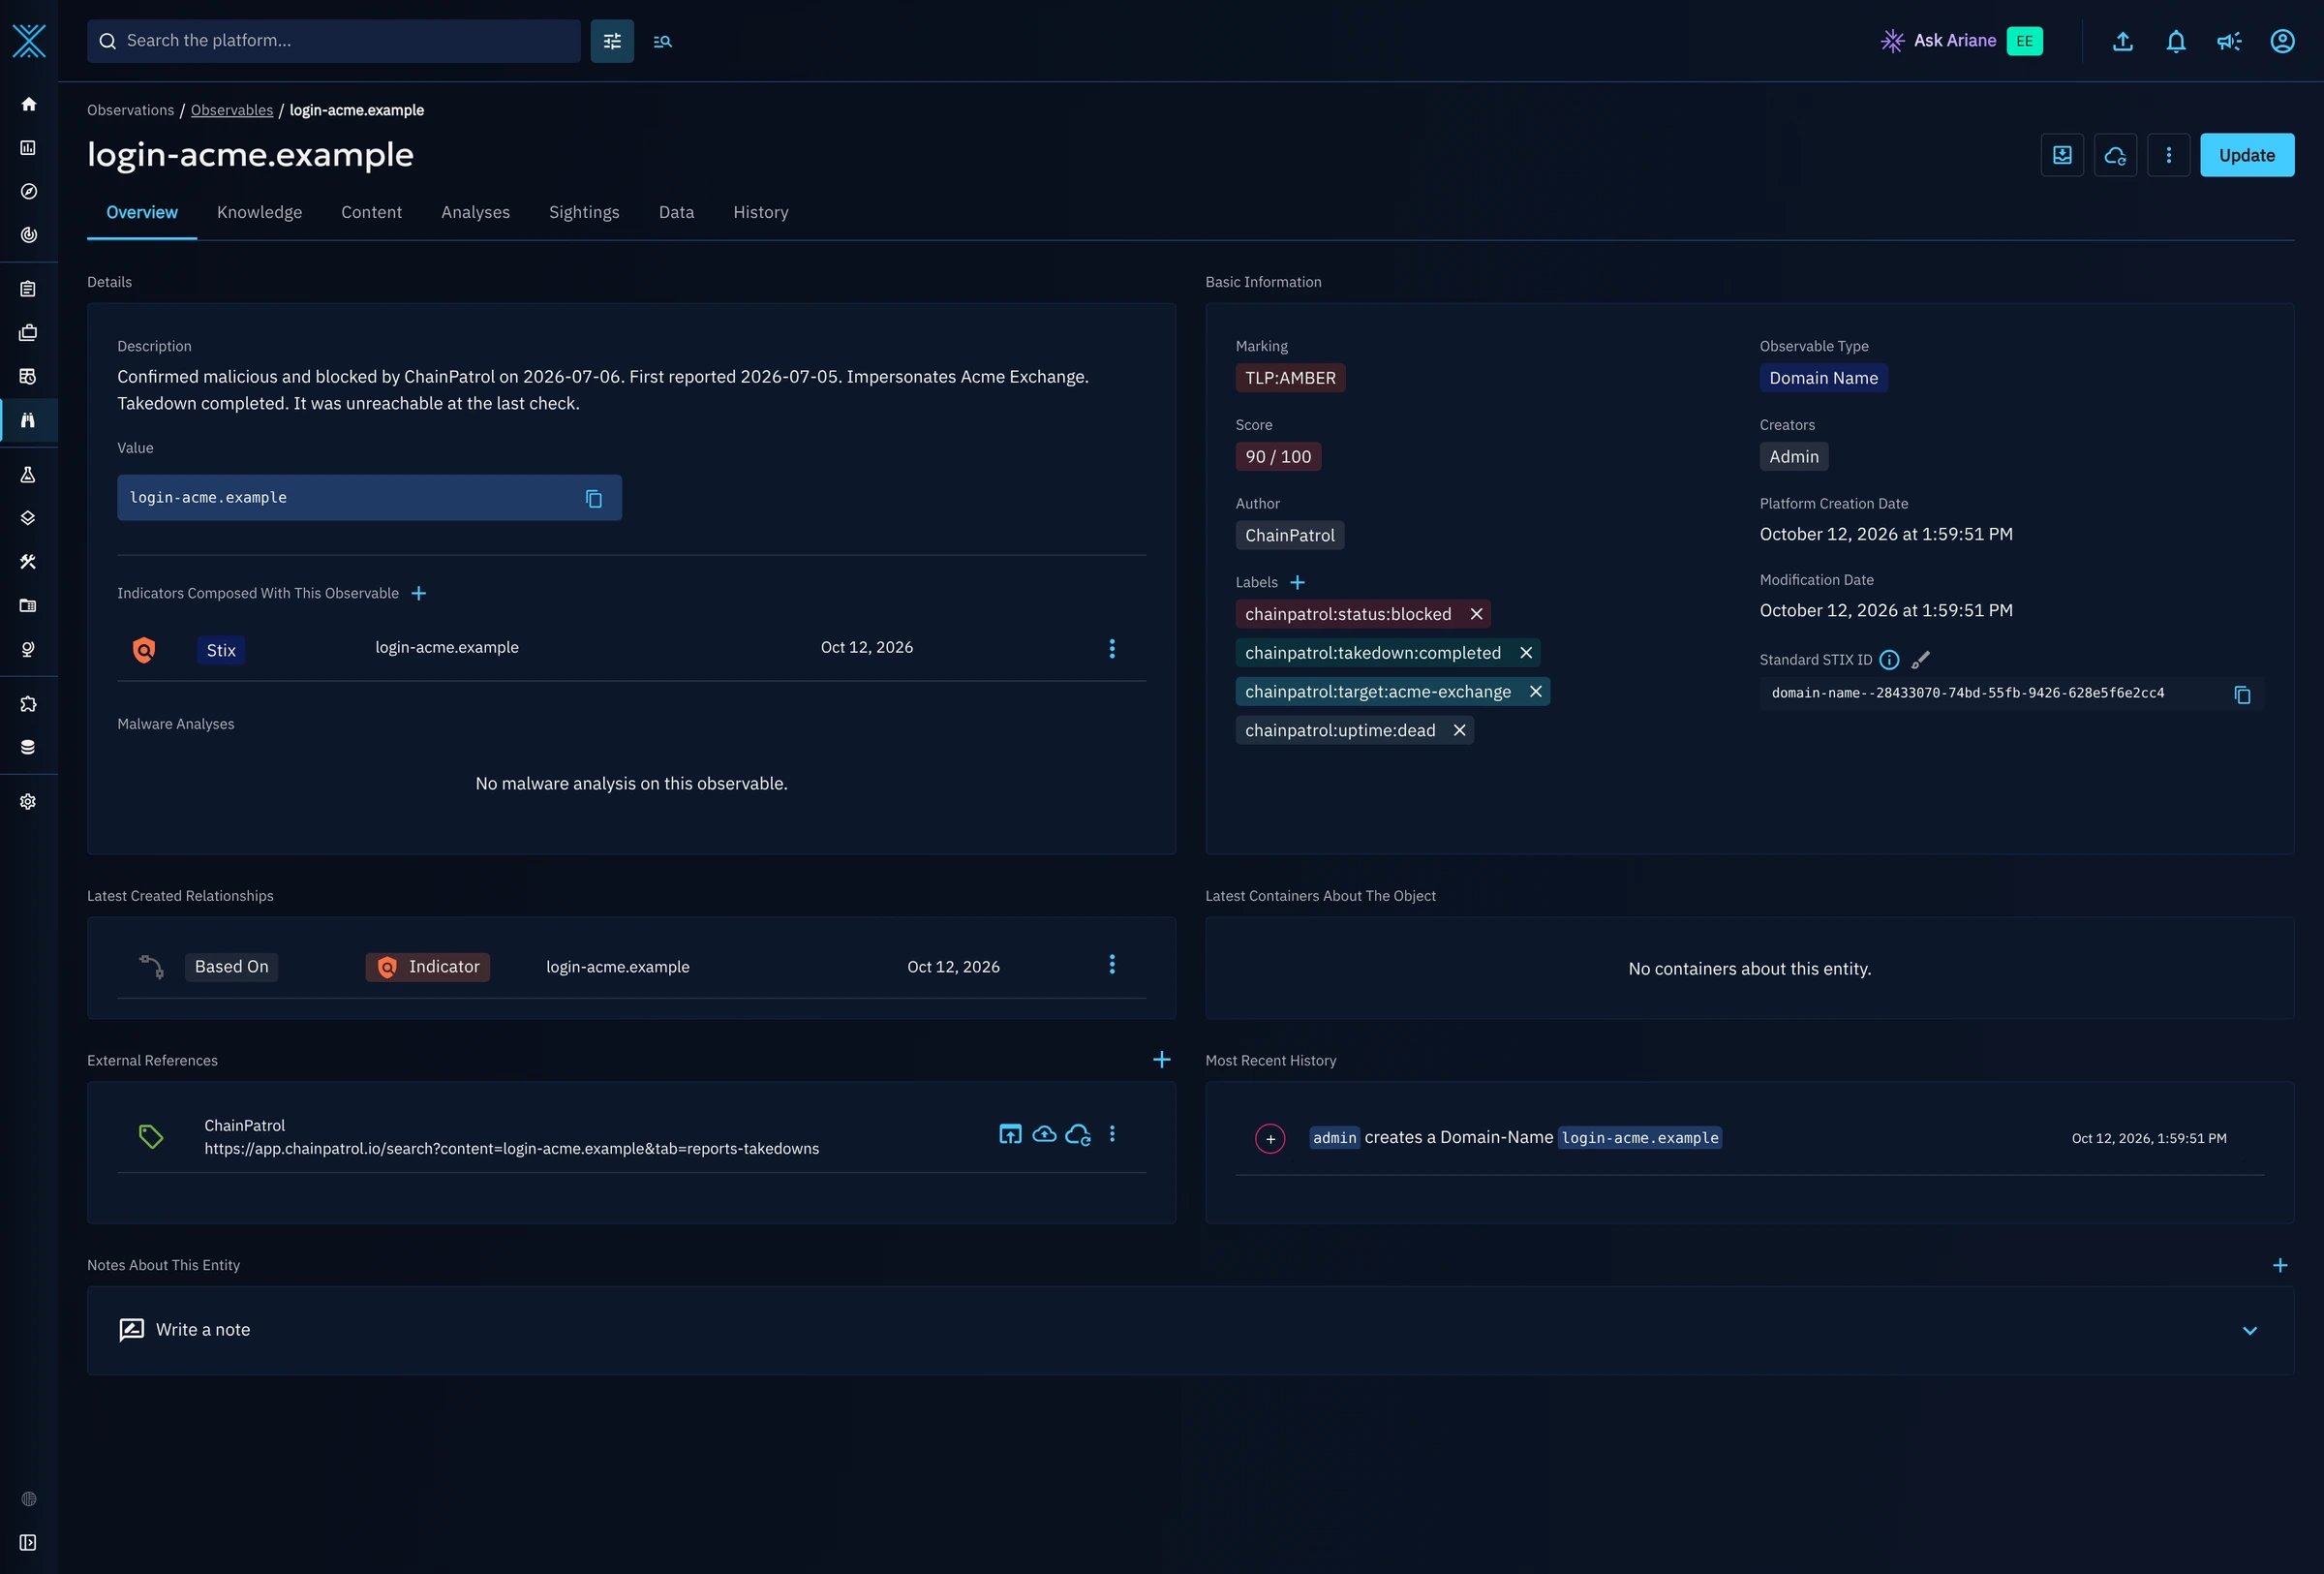
Follow a case from report to takedown
Open the indicator. Its original creation date is when ChainPatrol first saw the asset. Valid from is the sync that sent it, which keeps OpenCTI’s decay running from today rather than from the first report. Detection is on only for blocked assets.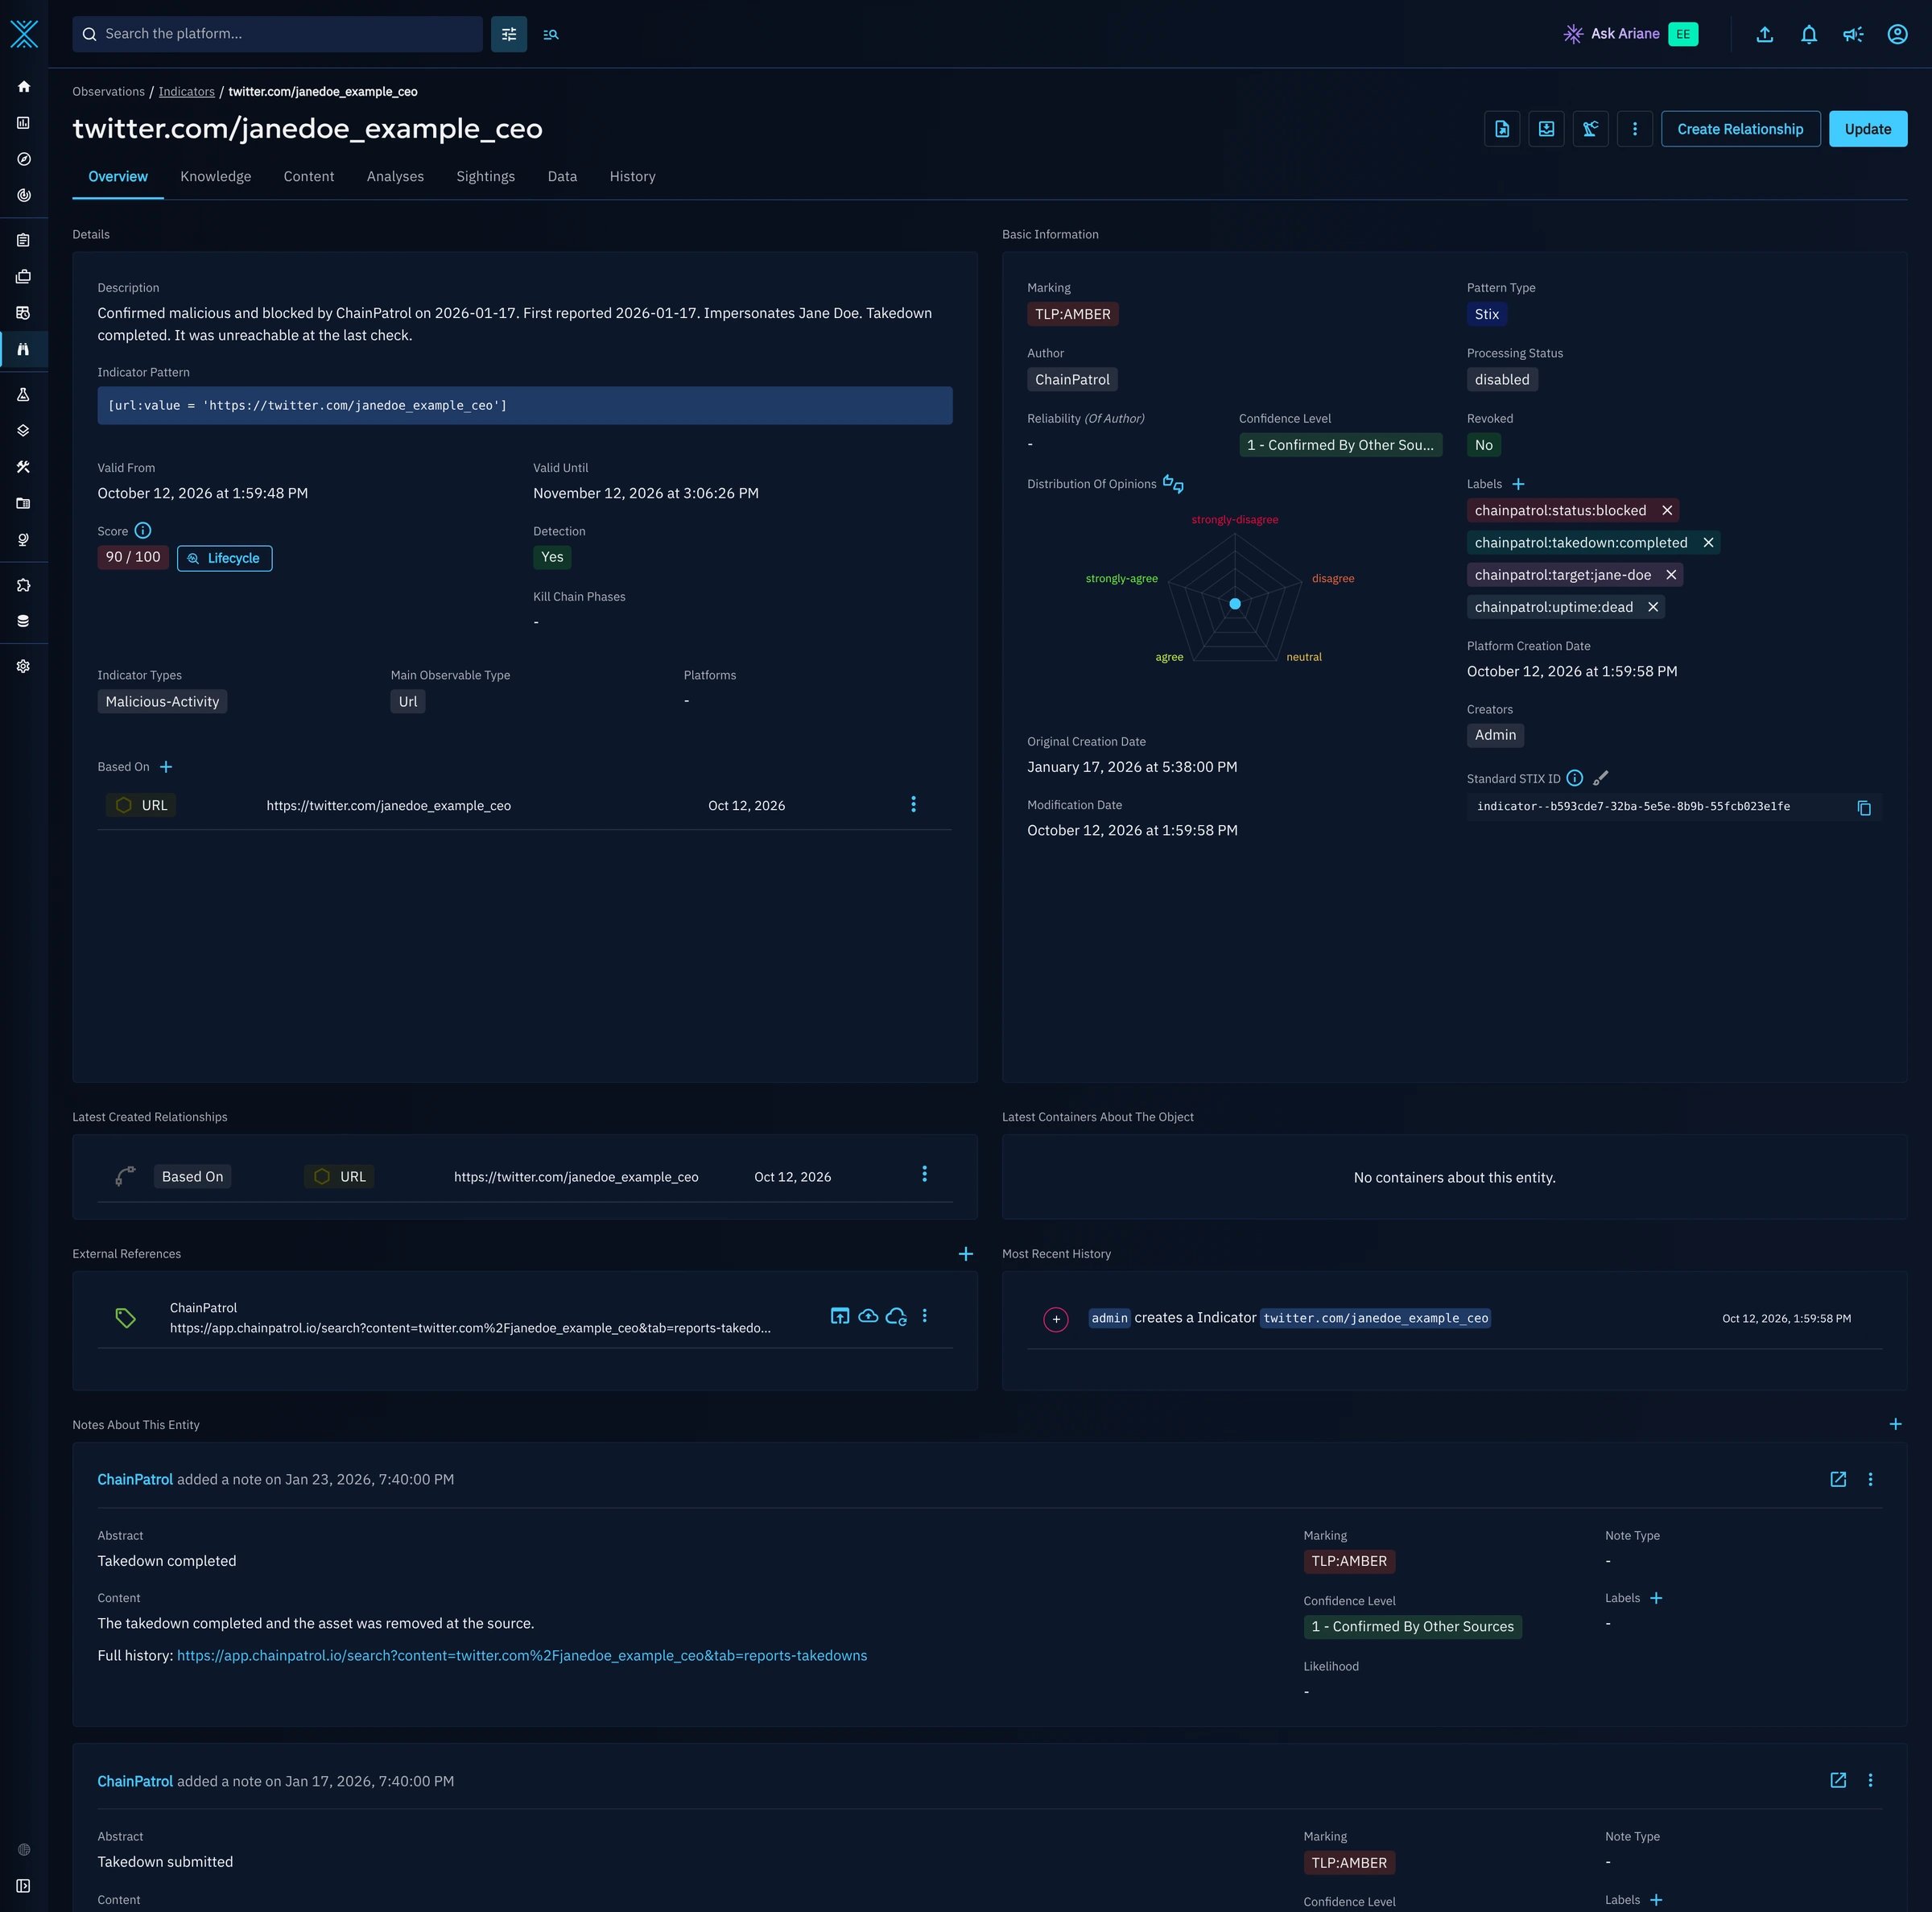
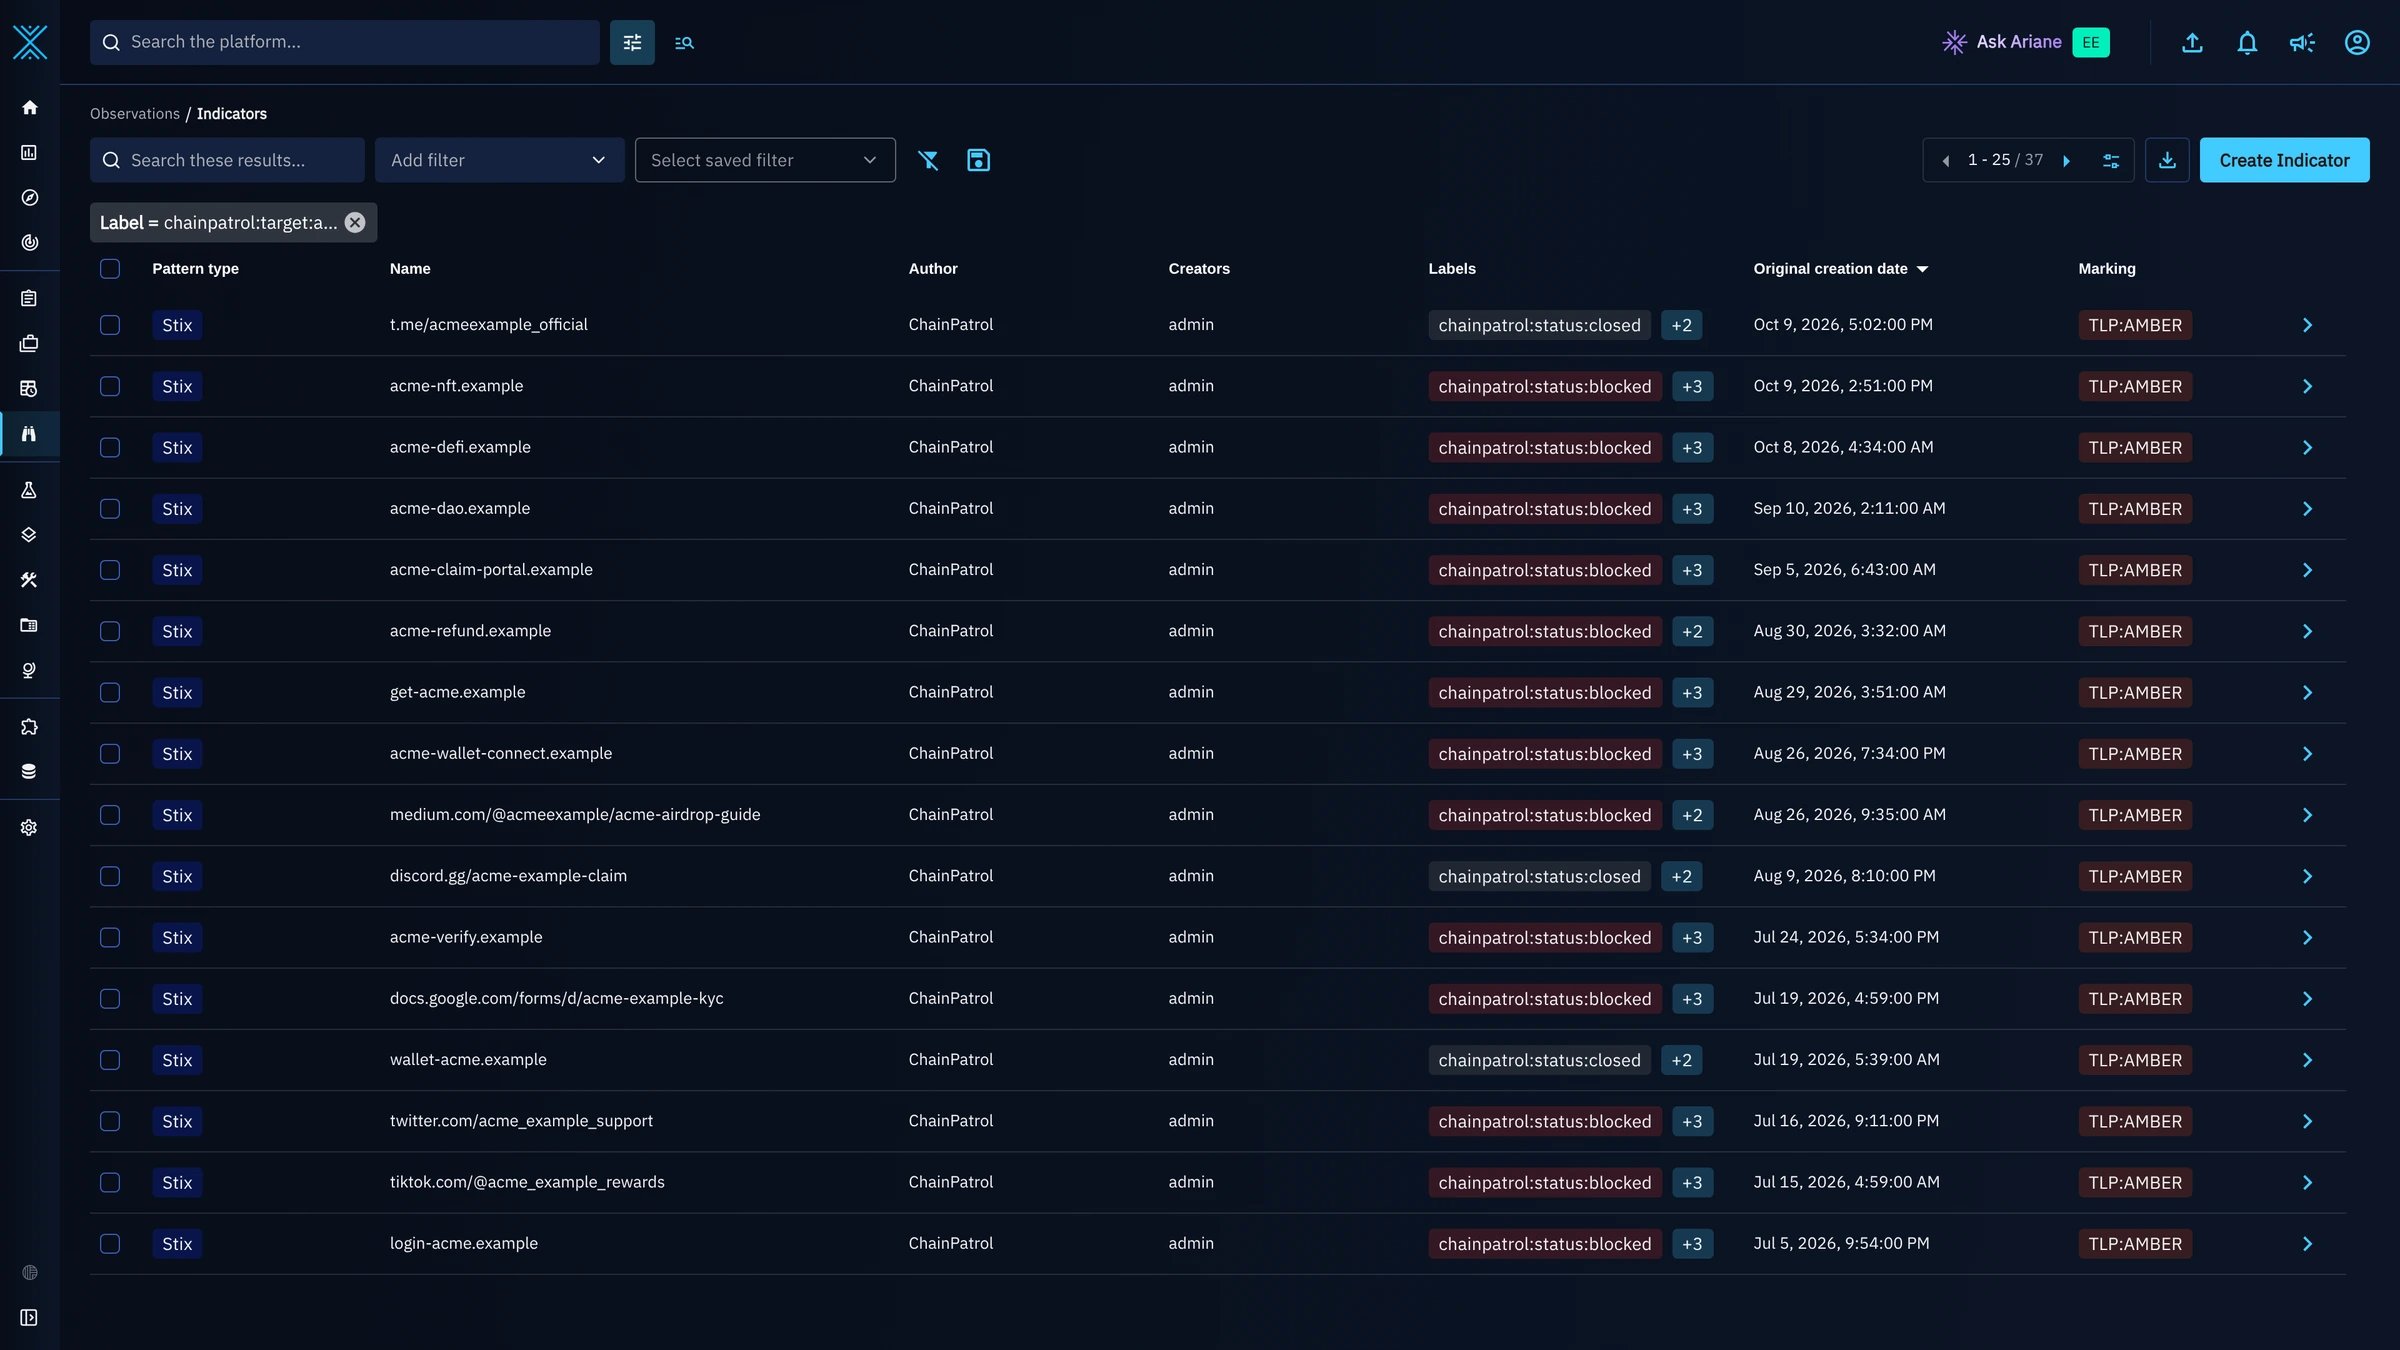
See everything impersonating one brand
Filter onchainpatrol:target:<your-brand> to scope a campaign. Brands and the people ChainPatrol protects for you, such as executives, each get their own label. Add a status or takedown label to narrow it further, for example everything targeting your brand that is still under investigation.
Track takedowns
chainpatrol:takedown:completed, submitted, open and cancelled show where each removal stands. Use the export button on a filtered list for your own reporting.
Pivot from a social profile to the account
A social media profile becomes a URL observable linked to a User-Account holding the handle. Open the observable’s Knowledge tab to reach it, and use the handle to correlate across your other sources.